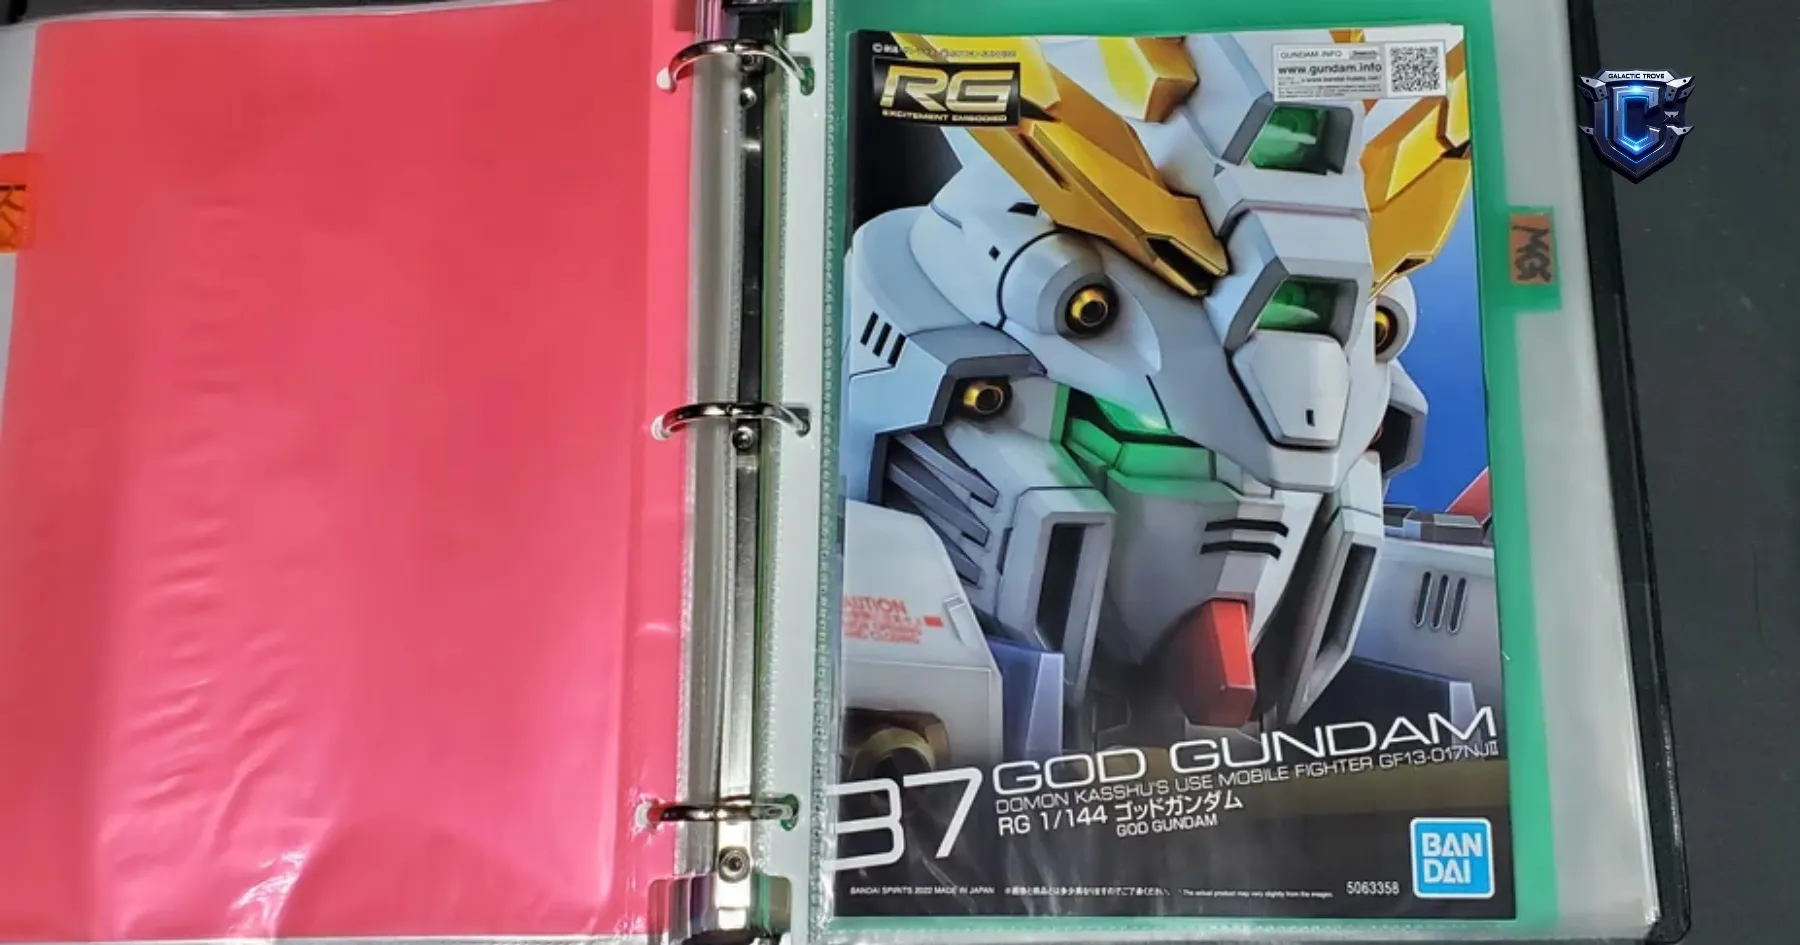
Let’s be honest. If you’re searching how to read Gunpla manual for beginners, you know this is the difference between a masterpiece and a $40 pile of regret.
My first manual? Ignored the symbols, thinking I was above the system. The result: A Zaku with two left feet.
You need to master the part numbering system Gunpla uses, or risk a full-blown glue disaster.
We are breaking down the Gundam assembly instructions 2026 style, so you avoid the dreaded wrong part placement.
Get ready to decipher the symbols and avoid total manual confusion.
Save yourself the heartbreak—stick around for the final CTA on tools.

I. The Manual Layout – Why How to Read Gunpla Manual for Beginners Starts Here
The vast majority of beginner model kit manual mistakes stem from a fatal flaw: the builder skips the first two pages. They jump straight to the leg assembly, thinking they’ll figure it out as they go. They won’t. They’ll end up with a backwards assembly or a missing runner disaster. The first two pages hold the key to understanding how to read Gunpla manual for beginners correctly.
The first two pages of any Bandai manual guide are not fluff. They are the legend, the key, and the GPS you need to navigate your 1/144 scale road to hell. Ignoring this section is like driving from New York to LA and deciding maps are for people who haven’t spent 15 years being broke and obsessed with plastic robots. Spoiler alert: you still need the map. Learning how to read Gunpla manual for beginners means understanding the blueprint. The structure is universal: Cover/Kit Info, Symbol Key, Runner Map, and then the Step-by-Step Assembly. Get these basics right, and you’ve already won half the battle against manual confusion.
1. Front Page Symbols Every Gunpla Beginner Ignores
Bandai’s genius is in its universal language of symbols. They don’t need Gunpla manual translation because a picture of a little bottle of glue is the same in Tokyo as it is in Texas. Yet, beginners ignore them, which leads to immediate regret and highlights their lack of knowledge on how to read Gunpla manual for beginners.
Here are the critical symbols that separate the masters from the mass of beginner model kit manual mistakes:
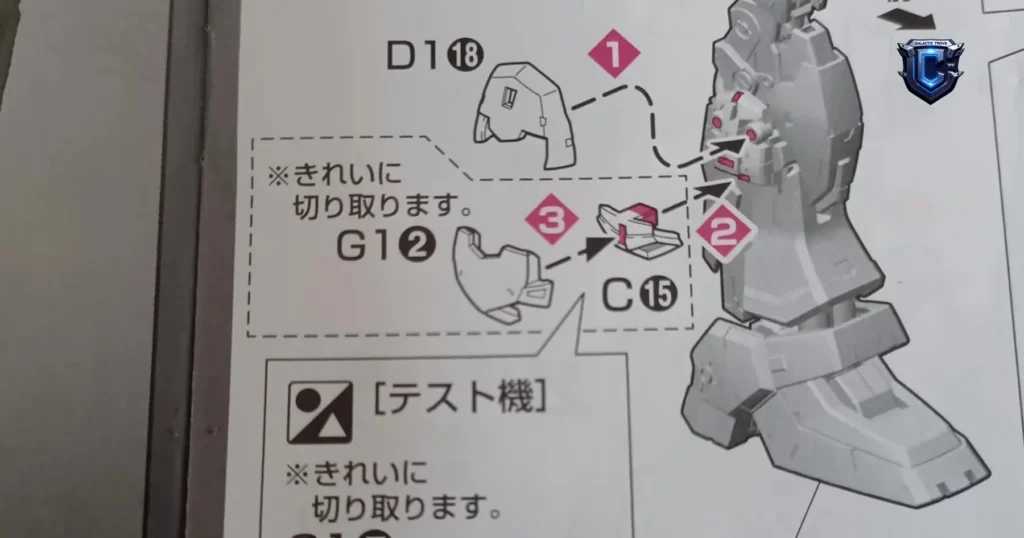
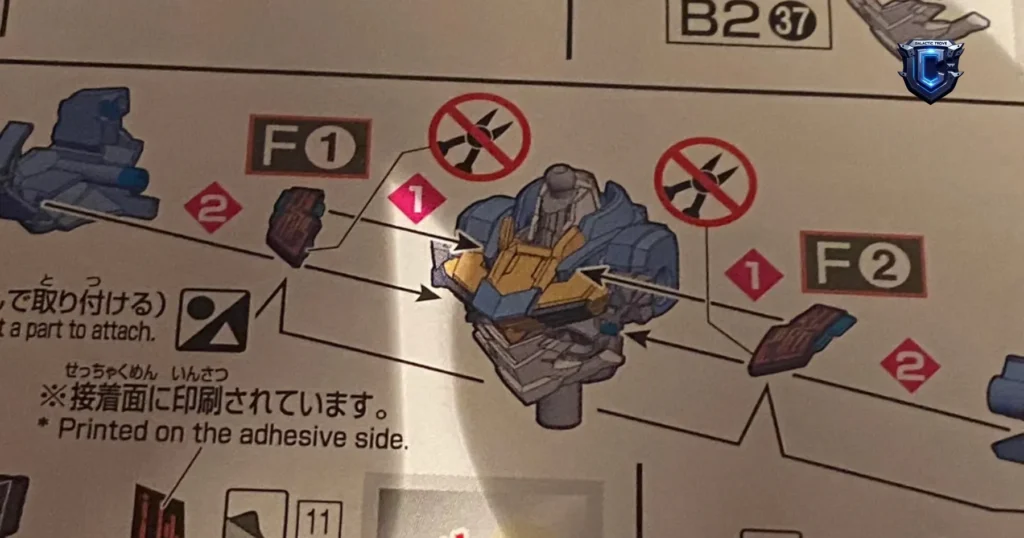
- The X Symbol (Crossed Out Part): This is the single most important symbol. It means “DO NOT USE THIS PART FOR THIS MODEL.” Gunpla runners often contain parts for alternate versions (like a standard Zaku and a custom Zaku II). If you see the X, put that part back in the box. Using it anyway often results in an unwanted feature, a non-functional joint, or a structurally unsound connection. This is the first lesson in how to follow Gunpla instructions.
- The Glue Symbol (A Bottle of Glue/Circle with a Cross): This is rare in modern High Grade (HG) and newer Master Grade (MG) kits, which are snap-fit. But when you see it, it means “PERMANENTLY ATTACH.” Ignoring this on older kits or certain sections (like internal frame piping) leads to joints popping out constantly—a mild heartbreak and a step toward a full-blown glue disaster.
- The Nippers/Cut Symbol: An obvious one, but often ignored. It tells you exactly where the recommended cut points are, especially useful for thin piping or cables where a bad cut leads to immediate snapped parts and reinforces the importance of how to read Gunpla manual for beginners.
- The Arrow Loop/Double Arrow: Indicates a mirror image or symmetry. It means: “Build this part, then build its identical twin (the left side) using the corresponding mirror-image parts.” This is where you avoid putting the left arm on the right side and making a crucial wrong part error.
If you don’t know what these gunpla manual symbols explained mean, you have no business touching the runners. They are the basic alphabet for how to read Gunpla manual for beginners.
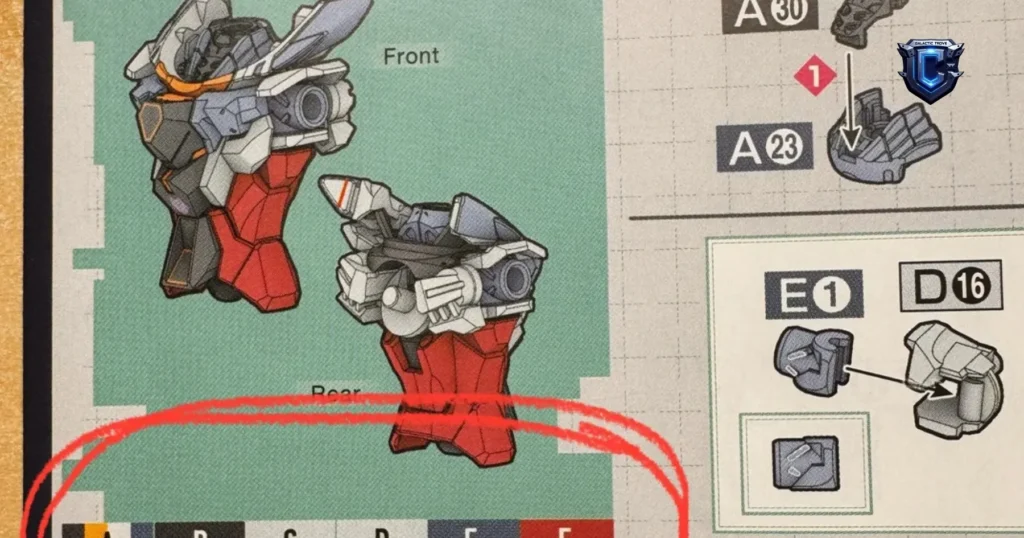
2. Runner Maps – Your GPS (or Road to Hell)
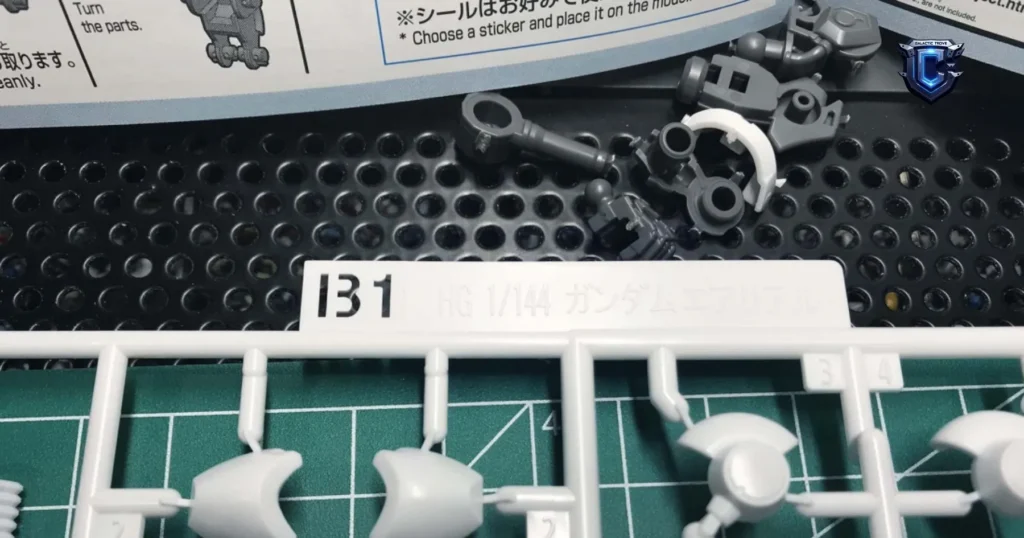
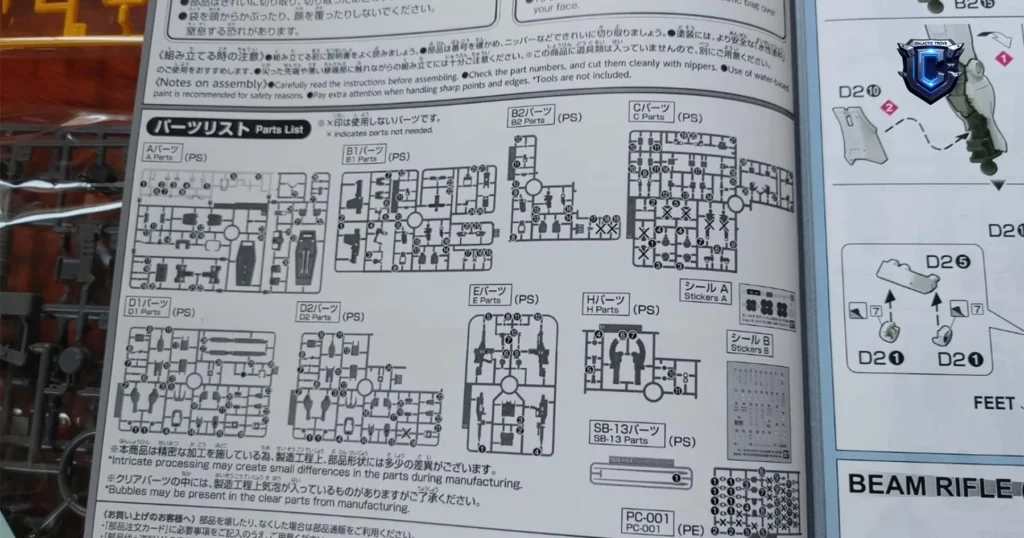
The Runner Map is usually on Page 2. It shows you every plastic frame (Runner) included in the box, designated by a letter (A, B, C, etc.) and sometimes a number (PC-1, S1). Next to the runner diagram, there’s usually a small key telling you the color and material (e.g., PS, ABS, PE). This map is crucial for how to read Gunpla manual for beginners.
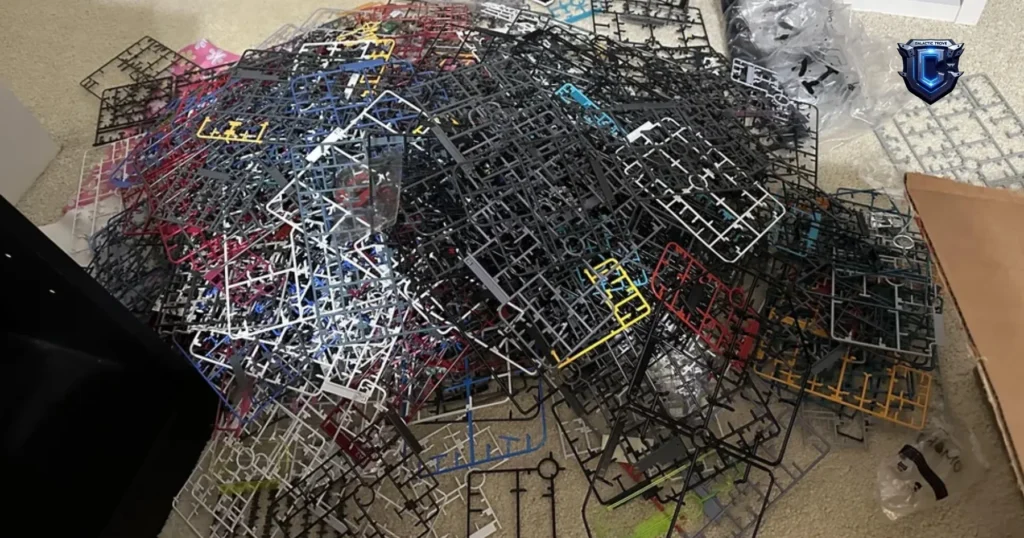
The Gunpla Runner Map Disaster:
This is where the gunpla runner map disaster happens. The beginner opens the box, sees 15 runners, thinks, “Too complicated,” and cuts all the parts off, dumping them into a single unlabeled tray. Suddenly, they have 30 identical tiny grey parts, labeled A12, C12, and D12, and zero idea which one is which. That, my friends, is a guaranteed path to manual confusion and a waste of three hours trying to identify a minuscule peg—pure, unadulterated regret. This is the most common of all beginner model kit manual mistakes.
The Pro Approach: Use the Runner Map as a checklist. Before you start a section (say, the Head), scan the map to locate the required runners (e.g., A, C, G). Only pull those three runners out. When the manual calls for part A1, you look on runner A. This is the only sane way how to follow Gunpla instructions and avoid the stress of a massive cleanup. Understanding this map is central to how to read Gunpla manual for beginners.
Table I: Gunpla Manual Symbols Explained – Skip This and Face Regret
| Symbol | Meaning | Regret if Ignored |
| X over part | Part Not Used | Wasted time, often leads to extra parts getting in the way or accidental backwards assembly. |
| Glue Bottle | Cement/Glue Required | The part will constantly fall off; if ignored on older kits, leads to glue disaster. |
| Nippers Icon | Cut/Trim Here | Leaving nub marks or snapped parts due to poor gate removal technique. |
| Dashed Arrow | Rotate/Move/Align | Joints won’t articulate correctly, often resulting in wrong part placement or breakage. |
| Shaded Area | Apply Sticker/Decal | Your final model looks bland, lacking crucial details. This is part of the gundam instruction sheet breakdown. |
II. Part Numbering System – The Code How to Read Gunpla Manual for Beginners Depends On
Forget everything you learned in high school math. The part numbering system Gunpla uses is the most critical alphanumeric code you’ll ever encounter. This is the core of how to read Gunpla manual for beginners. The manual doesn’t say “grab the upper left thigh armor.” It says “Grab A1, A2, and B12.”
If you haven’t mastered A1, B12, C5, you’re not building—you’re gambling. And in this hobby, the house (Bandai) always wins, leaving you broke and full of heartbreak. Knowing the part numbering system Gunpla uses is non-negotiable for how to read Gunpla manual for beginners.
3. A1, B12, C5 – What the Hell Does It Mean?
The code is simple, yet revolutionary:
- The Letter (A, B, C…): This designates the physical plastic Runner (frame) that the part is attached to. This is why the Runner Map is essential. Runner A is usually the primary color, Runner B the secondary, and so on.
- The Number (1, 12, 5…): This designates the specific location of the part on that Runner.
So, when your gundam assembly instructions 2026 sheet screams “B12,” it means: Find the plastic frame labeled B, and locate the piece with the number 12 printed next to it. This foundational knowledge of how to read Gunpla manual for beginners prevents countless headaches.
This system is designed to prevent manual confusion across language barriers. If you can read “B12,” you can build the model, regardless of whether you understand the Japanese text that might say “The part that holds the shoulder armor.” How to read Gunpla manual for beginners relies solely on this code.
The Part Numbering Fail: The beginner’s scam is thinking the parts are numbered sequentially (1, 2, 3…) across all runners. They aren’t. They’re numbered within each runner. Trying to find part C5 after cutting off A12 without paying attention to the letters is how pieces get mixed up, leading to the dreaded wrong part being permanently affixed. You must understand the part numbering system Gunpla demands.
This is also where the “don’t repeat my HG mistake” rule comes in: if you’re building an older HG (High Grade) kit, sometimes the parts look almost identical but have subtle differences (like a small peg hole for a shield). If you mix up A7 (left) and A8 (right), the piece won’t fit, or worse, you’ll try to force it, causing a catastrophic snap and the resulting regret. Check the Bandai manual guide meticulously.
4. My “Backwards Leg” Disaster Story
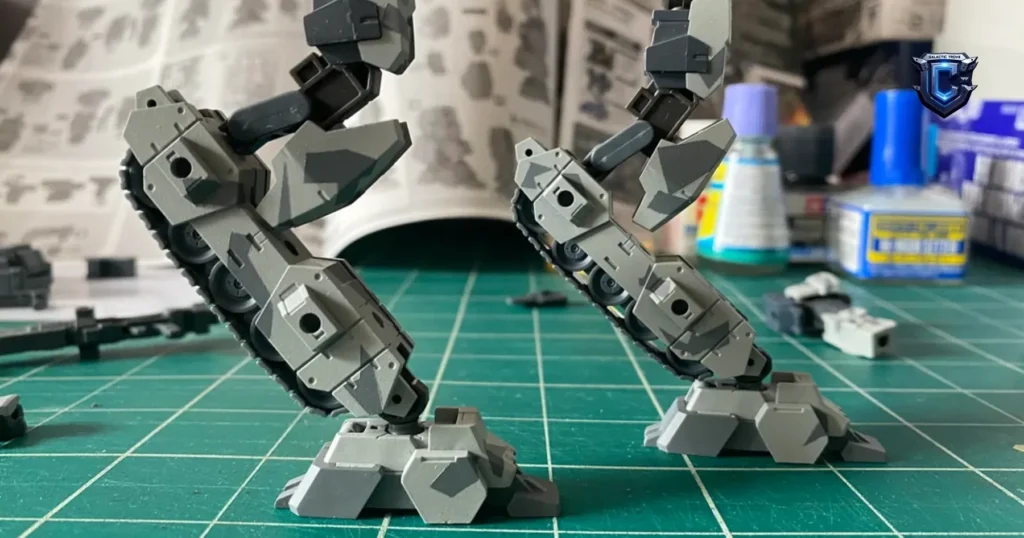
I was building this RX-78 manual nightmare Master Grade kit years ago, cocky and tired. The manual showed the inner frame assembly for the leg, a truly complex arrangement of pistons and joints. I was supposed to grab parts A15 and A16. They looked identical, just mirrored. I didn’t check the subtle indentation shown in the diagram, even though the gundam instruction sheet breakdown hinted at the difference.
I assembled the entire left leg frame, then built the right leg frame. When I finally went to snap the outer armor on, the armor for the calf would only attach to the inside of the knee assembly on the right leg—it was a backwards assembly. The entire leg was flipped 180 degrees inward. Because it was an older MG, I had already used Plastic Cement (a potential glue disaster), meaning there was no taking it apart without major damage.
Result: 3 hours wasted, one snapped piece, and a Gundam that could only moonwalk. All because I didn’t pay attention to the subtle alignment marks in the diagram for A15 vs A16. The heartbreak was real, and it’s why I take how to read Gunpla manual for beginners so seriously now. Understanding the part numbering system Gunpla utilizes would have saved me. I learned the hard way that one must study how to follow Gunpla instructions with care.
III. Step-by-Step Pages – Don’t Skip How to Read Gunpla Manual for Beginners Here
Once you leave the safety of the Runner Map, you enter the assembly phase. This is the meat of the guide, where every line, arrow, and diagram needs your full, undivided, jaded attention. This is where you actually learn how to follow Gunpla instructions properly.
Each step is a small box diagram, and within that box is a world of silent instruction that, if missed, leads directly to a wrong part insertion or a build that is simply wrong. This section defines how to read Gunpla manual for beginners.
5. Arrows, Dashed Lines, and the Dreaded “Fold Here”
The diagrams are less about English and more about spatial visualization. Get used to the core visual cues, which are central to how to read Gunpla manual for beginners:
- Solid Line Arrows: Always indicate the direction of attachment. Part A attaches to Part B in the direction of the arrow. This is simple, but often builders try to force a fit from a different angle, resulting in a snap. Learning how to follow Gunpla instructions means respecting the arrow.
- Dashed Lines: These are the unsung heroes of the manual. They indicate a piece is already assembled in a previous step, but is being reused in the current step. They also often indicate a piece that is beneath the current assembly layer. Seeing a dashed line connection is key to understanding the full gundam instruction sheet breakdown.
- Curved Dashed Arrows (Rotation): These tell you to orient a piece before inserting it, or to rotate a joint after assembly. Ignoring this leads to a backwards assembly and limited articulation later. This is a common beginner model kit manual mistakes.
- The Dreaded “Fold Here” or “Bend” Symbol: This usually applies to poly-caps (the soft plastic joint pieces) or sometimes thin foil stickers. It means you must pre-bend the piece slightly to ensure it fits the curve of the socket. Forcing an un-bent poly-cap can lead to a quick, regrettable snap.
This visual language is the key to successfully using gundam assembly instructions 2026. Don’t assume. Observe the arrows and dashed lines carefully.
6. Translation Traps in 2026 Bandai Manuals
In the past, poor gunpla manual translation led to some truly hilarious and confusing instruction blocks. “The arm of justice must be affixed thusly!”
Thankfully, Bandai manual guide quality in 2026 relies almost entirely on the diagrams. Any text you see (usually on the first few pages or the final color pages) is usually:
- Part Name/Background: Japanese text giving the full name of the mobile suit, the weapon, or the pilot. Irrelevant to the actual build.
- Color Codes: Essential if you plan to paint. These are numerical codes for Mr. Color or Tamiya paint ranges.
- Warnings/Notices: Usually related to potential choking hazards, glue use, or runner disposal.
The Trap: Do not waste time trying to perfectly translate the Japanese text in the middle of the leg assembly. If you can identify A12 and follow the solid arrow, you are fine. Focusing on the supplementary text is the definition of manual confusion for a beginner, distracting you from the crucial visual information for how to read Gunpla manual for beginners. If you must know, use Google Translate’s camera function, but focus on the visual instructions first and foremost. Knowing how to read Gunpla manual for beginners means prioritizing the visual steps.
IV. Common Manual Mistakes – Every How to Read Gunpla Manual for Beginners Horror Story
After 15 years of being scammed by my own arrogance and leaving behind a trail of snapped and backwards assembly mobile suits, I can distill the most common beginner errors. Avoid these 10 mistakes if you want to save yourself the heartbreak and prevent a massive glue disaster. These are the key pitfalls when learning how to read Gunpla manual for beginners.
7. 10 Ways to Screw Up Your Build (and Quick Fixes)
- The “Pre-Cut All Runners” Mistake (The Runner Map Disaster): The most common beginner model kit manual mistakes. You get lost immediately, proving you didn’t learn how to read Gunpla manual for beginners.
- Fix: Only cut the runners for the current body section (e.g., Head, Torso). Use a small parts organizer to label any remaining loose parts clearly.
- Ignoring the “X” Symbol: Building with parts that aren’t intended for the kit, leading to an extra parts mess.
- Fix: Check the legend. If it has an X, it goes into the spares box. No exceptions. This is basic how to follow Gunpla instructions.
- Forcing the Connection: When a piece doesn’t snap perfectly, and you push harder, resulting in a snap.
- Fix: STOP. The manual is correct. Check for flash (excess plastic), check the orientation (is it a backwards assembly?), or check the part numbering system Gunpla calls for. A proper snap-fit requires minimal force.
- Mixing Up Left and Right (L and R): The cause of the dreaded asymmetrical Zaku and a classic wrong part error.
- Fix: Look for the tiny ‘L’ and ‘R’ molded onto the part or printed next to the part number in the manual. They are always there, even in the smallest diagrams of the gundam instruction sheet breakdown.
- Skipping the Poly-Cap Step: Forgetting the rubbery pieces that create the joints, resulting in a floppy model.
- Fix: Always install poly-caps before snapping the hard plastic armor over them. If you skip this, you’ll have a floppy, non-posable model.
- The Sticker Misplacement: Trying to place foil or giant stickers using your fingers, leaving them sticky.
- Fix: Use tweezers! Fingers leave oils, causing the sticker to lift or look terrible.
- The Seam Line Confusion (HG Trap): Thinking the seam running down the arm is intentional.
- Fix: It’s a seam line. If it’s not a panel line (a recessed detail), it’s where two parts join. Advanced builders use plastic cement to fill and sand these.
- The Unchecked Runner (The Scourge of C1): Assuming C1 on one kit is the same as C1 on another, leading to manual confusion.
- Fix: C1 is C1 only on this RX-78 manual nightmare kit. Always refer to the current manual’s Runner Map.
- Using Super Glue (The Ultimate Glue Disaster): Trying to fix a mistake with CA glue, resulting in white fogging and permanent destruction.
- Fix: NEVER use Super Glue (CA glue) on Gunpla. It leaves white residue, eats the plastic, and locks the pieces permanently, guaranteeing no chance of disassembly. Use dedicated Plastic Cement if required, only when specified by the Bandai manual guide.
- Tearing the Manual: Using the manual as a cutting board or wiping up paint/glue spills, ruining your essential guide.
- Fix: Treat the gundam instruction sheet breakdown like a sacred document. Keep it clean and flat on a cutting mat. You’ll need it for the final color guide and decal placement.
V. Pro Tips to Master How to Read Gunpla Manual for Beginners in 2026
You’re a veteran now. You understand the part numbering system Gunpla uses and the meaning of those little diagrams. Here are the final advanced tips to ensure you never again suffer the regret of a poorly built kit.
The key to mastering how to read Gunpla manual for beginners in 2026 is blending the physical process with the instructions. These tips minimize the chance of beginner model kit manual mistakes.
8. Manual Hacks for Zero Regret
| Manual Hack | Description |
| The Circle & Highlight | Before starting a step, use a marker to circle required part numbers (A1, C5) on the page. Forces attention to the part numbering system Gunpla uses. |
| Pre-Sort and Label | Use small containers to store parts cut from the current runner, labeled by the step number. Avoids the gunpla runner map disaster. |
| The Phone Translator | Use a camera translation app for supplemental Japanese text on the Bandai manual guide when required, but prioritize the diagrams. |
| Check Runner Layout | Use a magnifying lamp to confirm subtle differences (L/R) on nearly identical parts, preventing wrong part placement and backwards assembly. |
The Circle & Highlight Hack: This is a game-changer for speed and accuracy. It forces your brain to register the part number before your hand reaches for the runner, drastically reducing the chance of grabbing the wrong part and preventing manual confusion. It’s the simplest way how to read Gunpla manual for beginners like a pro.
Pre-Sort and Label: This eliminates the biggest cause of panic. By labeling containers, you ensure that if a part falls off your desk, you know exactly which step it belongs to, saving you hours of searching and immense heartbreak.
The Phone Translator: If you absolutely need to understand the Japanese text (usually for specific warning notes or painting guides), use Google Translate or a similar app. Just point your phone camera at the text on the gundam instruction sheet breakdown, and get the instant (though often rough) gunpla manual translation. Focus on the visual steps for how to read Gunpla manual for beginners.
Mastering how to read Gunpla manual for beginners is about discipline. You must learn to treat the instruction sheet like the holy text it is. Follow the arrows, respect the part numbers, and never, ever force the connection.
Conclusion
You asked how to read Gunpla manual for beginners, and now you know: it’s not about reading English; it’s about respecting the universal language of diagrams.
You now understand the perils of the gunpla runner map disaster, the importance of the part numbering system Gunpla relies on, and the sheer regret caused by a simple backwards assembly. This knowledge is your shield against the scam of rushing the process. Every time you check that symbol, every time you verify that ‘R’ for the right side, you are saving yourself hours of heartbreak and preventing a snap and the resulting glue disaster.
Don’t let your journey end with a wrong part or a glue disaster. Build smart, build clean, and build correctly, following this definitive guide on how to read Gunpla manual for beginners.
- Best Detolf Alternatives 2026: 8 Cases That Elevate Your Jaegers - November 30, 2025
- Best Transformers Action Figures 2026: Only 7 Didn’t Make Me Want to Sell a Kidney - November 26, 2025
- The Benefits and Risks of Collecting Limited Edition Models in 2026 - November 23, 2025

Great breakdown of the manual! I’ve always felt overwhelmed by the symbols, but now I see how crucial they are. I never realized how much of a difference it makes to follow the numbering system properly.
That’s fantastic to hear!
I totally get it! At first glance, those Gunpla manuals look like a graduate thesis in alien architecture! They’re just a dizzying maze of strange shapes and numbers jumping all over the page.
But you’ve just unlocked the Gunpla Truth:
The Symbols: They’re not some secret code, they’re the “wizard” Bandai’s helpful little nudges to tell you when to cut, when to sticker, or when to brace for a tiny, fiddly decal.
The Numbering System: Absolutely the unsung hero! Ignore it, and you risk ending up with one arm longer than the other, or worse, assembling something that makes you ask, “What exactly did I just build?”
Cheers to you for cracking the code! You now possess the ‘superpower’ needed to tackle any kit that comes your way!
Which Gunpla are you planning to conquer next with your new ‘superpower’?
I totally relate to that Zaku with two left feet story—my first few builds were a mess until I finally took the time to understand the part numbering system. The runner maps are a game-changer, honestly; they make navigating the manual so much easier when you know what to look for. This guide really hits on the core issues beginners face, and it’s great to see someone breaking it down in a way that actually helps avoid those frustrating glue disasters.
That’s exactly the moment when Gunpla starts to “click,” right? 😄
Once the part numbering system and runner maps make sense, the whole manual suddenly feels way less intimidating. It’s crazy how many early mistakes come just from skipping those first pages.
Out of curiosity—what kit were you building when it finally clicked for you? And do you mostly build HG, MG, or something bigger these days?
Thanks for breaking down the manual reading process so clearly—especially the part numbering system. I remember getting completely lost in my first Zaku manual and ending up with a mismatched arm. Your explanation of how to use the runner maps and interpret those symbols actually made me go back and re-read my old manuals with a fresh eye. This kind of guidance is exactly what new builders need to avoid those frustrating glue disasters.
Haha, the classic Zaku arm struggle! We’ve all been there—nothing humbles a builder faster than a backward elbow or a mismatched part. I’m really glad the runner map guide helped you see those manuals in a new light. Once you ‘crack the code’ on the symbols, the whole process becomes way more relaxing. What are you working on now? Hopefully, no more glue disasters this time!
The ‘two left feet’ anecdote perfectly captures the panic of ignoring runner maps, which are absolutely critical for beginners to avoid those irreversible glue disasters. I also appreciate the specific callout on translation traps in the 2026 manuals, as that’s often an overlooked detail that leads to major frustration down the line.
Thank you for sharing! You’re right; those ‘translation traps’ in the 2026 manuals can easily deceive you if you focus too much on details and ignore the big picture. Comparing the runner map to a GPS is a great analogy. Do you have any other tips or ‘hacks’ for dealing with those tricky little symbols, or do you usually have to look them up somewhere else?
That Zaku with two left feet is a classic tragedy I’ve almost lived myself, and your breakdown of the runner maps as a ‘GPS or Road to Hell’ perfectly captures that struggle. The section on avoiding translation traps in 2026 Bandai manuals is especially timely, since those symbols can feel like a different language when you’re trying to prevent that first glue disaster.
Totally relate! Looking back at the 2026 Bandai manuals, they can still be a bit of a ‘brain-teaser,’ especially the tiny symbols. But as you said, once you ‘crack the code’ of the numbering system and symbols, it becomes a fun part of the hobby. Have you gotten used to checking before cutting, or do you still ‘grab the wrong part’ occasionally?
The ‘Zaku with two left feet’ disaster is painfully relatable, and your breakdown of runner maps as a GPS really drives home how crucial they are before committing to glue. I especially appreciate the warning about translation traps; those symbols can get so ambiguous when you’re rushing and not paying close attention to the part codes. This guide is a lifesaver for anyone dreading the assembly phase!
Thank you for sharing! The ‘two left feet Zaku’ feeling is a classic beginner’s nightmare. Once you’ve mastered the runner maps, it’s like having a map in hand; everything becomes much smoother. Hope you don’t run into any more ‘glue accidents.’ What project are you planning next?
Such a helpful breakdown — the runner map and part numbering reminders really hit home. I used to dive straight into step one and always ended up with mysterious leftover parts and the occasional backwards arm, but treating those first two pages like actual reading material changed everything. Great guide for anyone picking up their first High Grade.
Great beginner-friendly guide! The runner maps and part numbering section finally made sense of all those letters and numbers I had been ignoring. The two left feet Zaku story was the perfect reminder to read the symbol legend before cutting anything. I will be a lot more patient with my next kit.
The X symbol breakdown alone is worth the entire article — I’ve skipped that legend page on every single build and ended up with mystery parts I had no use for. The runner map section finally made me realize how much wasted plastic I could have avoided by just reading the first two pages. Definitely going to slow down on my next HG kit, and I want to try filming the finished pose with motion reference tools to make a short showcase video. Thanks for the real-talk guide!
Ha, the ‘Zaku two left feet’ disaster got me too on my first MG kit — never trust a blurry instruction scan at 2am. I’ve started using Unblur Image to sharpen photos of runner maps and tiny part codes when I can’t read the ‘X’ symbol in a dodgy PDF, which saves a ton of squinting. Honestly this whole guide should be printed and taped inside every beginner’s toolbox alongside their nippers.
That “Zaku with two left feet” bit had me laughing because I’ve been there—ignored a mirror-arrow and ended up with a very confused suit. The X-symbol section is the one every beginner needs tattooed on their arm, and honestly your take on the 2026 Bandai translation traps saved me some guesswork. Once the build’s done and I want to plan action poses, I’ve been leaning on motion reference tools to sketch out dynamic shots before committing to a diorama, which pairs nicely with getting the runner map reading right first.